Customers
This task is used to search, edit, or inquire into the customers on your system.
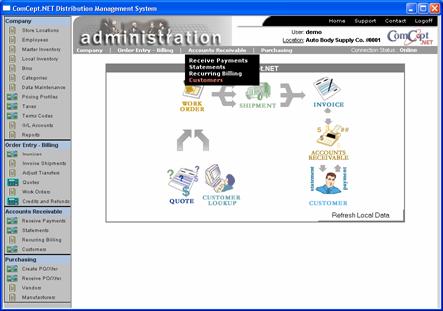
Select Customers from the Navigation Bar or from the Drop Down Menu Accounts Receivable.
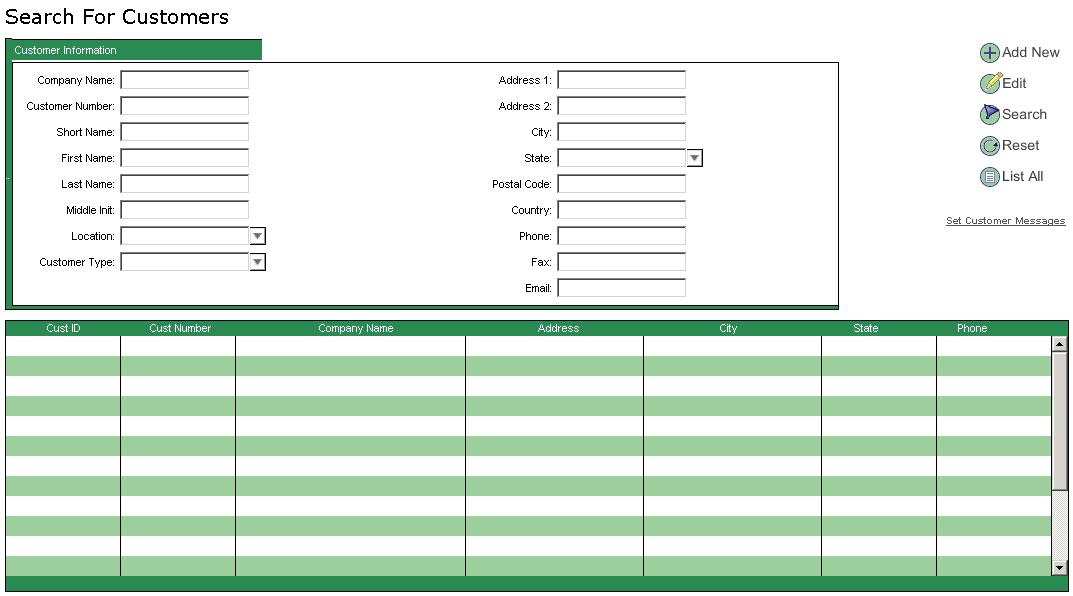
Search For Customers
The
Search For Customers screen is the first screen that is displayed when the
Customers task is selected. This screen is used to search for customers that exist on the system. Individual customers can then be selected for inquiry or editing from those displayed.
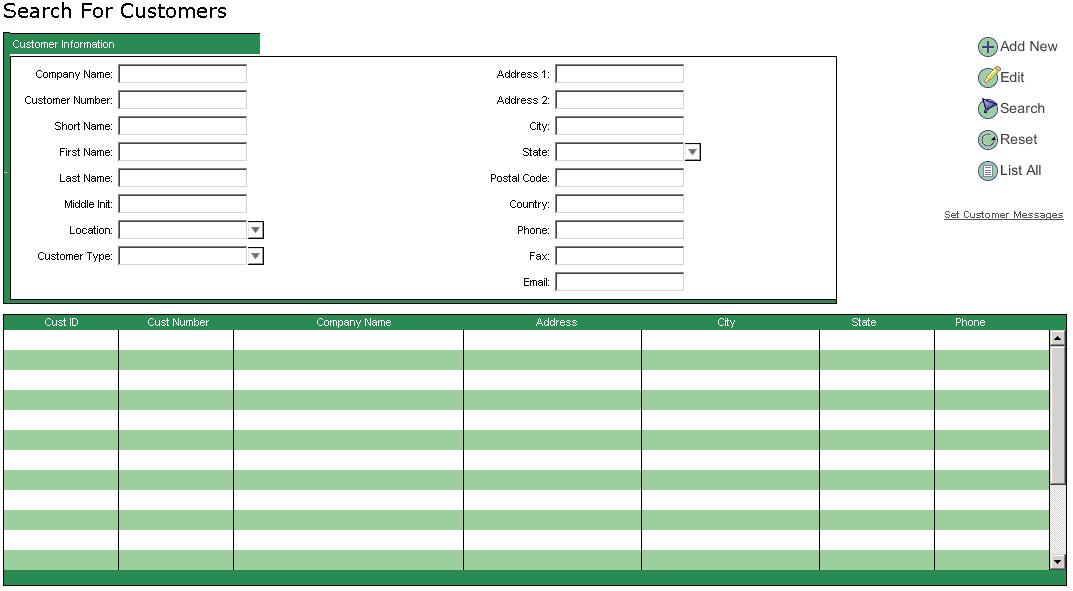
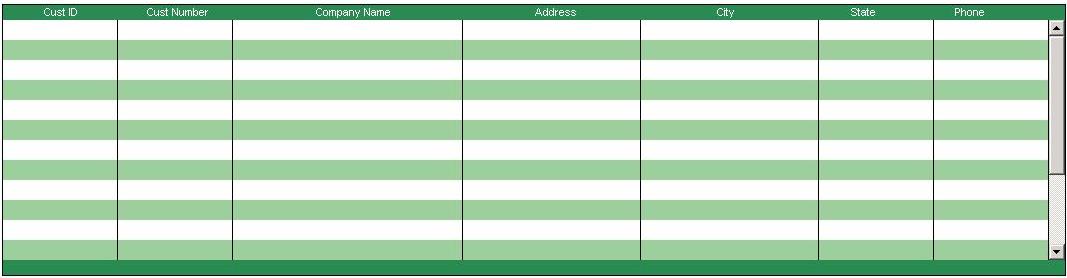
The work area or screen area is made up of the following three sections:
- The search fields (top center).
- The search action buttons (top right).
- The record display area (bottom half).
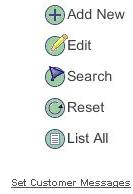
Add New Customer Action
To add a new customer, select the
Add New action button from the Search For Customers screen.
-or-
Select the Add New Customer option located on Action menu.
Customer fields
General Information
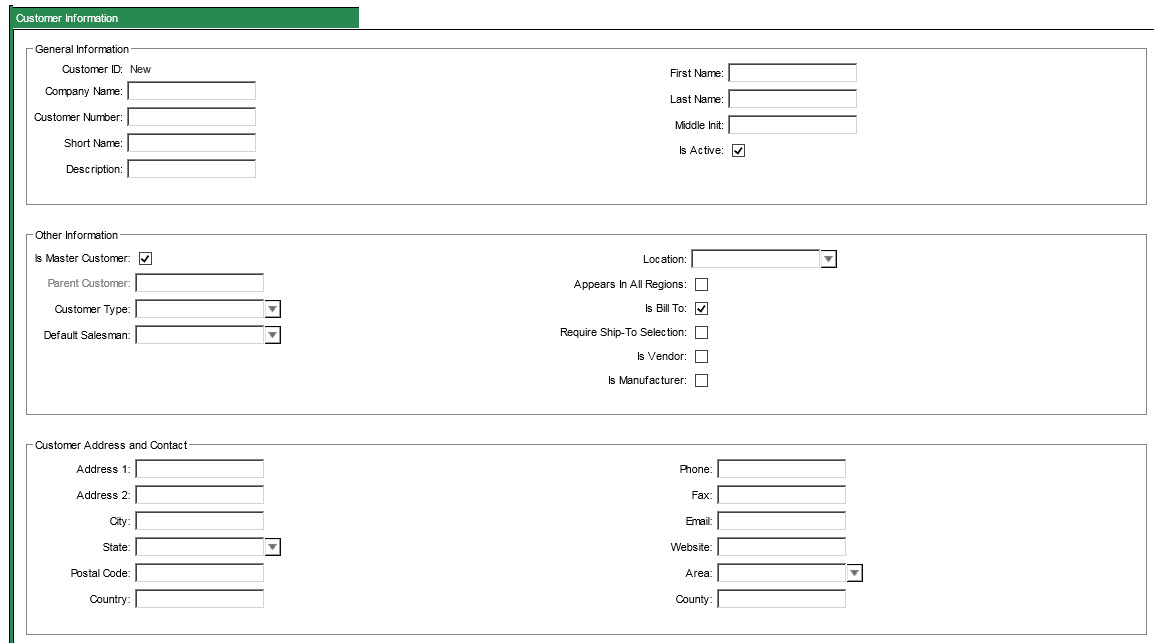 Customer ID:
 This is the internal CDN customer number. It is assigned when the customer information is saved the first time (“New” is displayed until saved).
Company Name: This is the legal company name for the customer. This will be printed on invoices, work orders, quotes, statements, etc.
Customer Number: This is a user defined number used to reference the customer. It can be used as a search method for the customer lookup in the
Order Entry – Billing tasks. This field is often pre-loaded during conversions with the customer number from your company’s prior computer system.
Short Name: This is a descriptive short name for the customer. It can be used as a search method for the customer in the
Order Entry – Billing tasks. This field is often pre-loaded during conversion with the customer alpha from your company’s prior computer system.
Description: Optional description of customer or business.
First Name: This is the first name of the owner or manager.
Last Name: This is the last name of the owner or manager.
Middle Init: This is the middle initial of the owner or manager.
Is Active: Select this box if the customer is active for billing or receiving payments.
Other Information
Is Master Customer: Select this box if this is the master or “Bill to” customer record. Deselect this box if this is a “Ship to” customer record. The
Master Customer is used to consolidate all “Ship to” customer statements onto one statement. Always select this box for a customer with only one record.
Parent Customer: Use the drop down box to select the
Master Customer for this “Ship to” customer record. This field is not accessible if this customer was selected as a
Master Customer in the prior field.
Customer Type: Use the dropdown box to select the desired customer type.
Default Salesman: Use the dropdown box to select the salesperson assigned to this customer. Salespeople are maintained in the
Employees task and must have the Salesman box selected.
Location: Use the dropdown box to select the location that services this customer.
Appears In All Regions: Select this checkbox if this customer needs to appear in all locations. This feature only applies when Regions is activated.
Is Bill To: Select this box to indicate that this is a valid customer for use with
Order Entry – Billing and
Accounts Receivable tasks.
Require Ship-To Selection: Requires POS documents have a Ship-To location other than the Bill-To location selected. Click
here for details.
Is Vendor: Select this box to indicate that this is a valid vendor for use in Inventory, Pricing, and
Purchasing tasks.
Is Manufacturer: Select this box to indicate that this is a valid manufacturer for use in Inventory, Pricing, and
Purchasing tasks.
Customer Address and Contact
Address 1: This is the first line of the customer’s address.
Address 2: This is the second line of the customer’s address.
City: This is the city for the customer’s address.
State: This is the state for the customer’s address.
Postal Code: This is the postal code (zip code) for the customer’s address.
Country: This is the country for the customer’s address.
Phone: This is the customer’s main phone number.
Fax: This is the customer’s main fax number.
Email: This is the customer’s main e-mail address.
Website: This is the customer’s web site.
Area: Reserved for future use.
County: This is the county where the customer is located.
Taxes and Billing
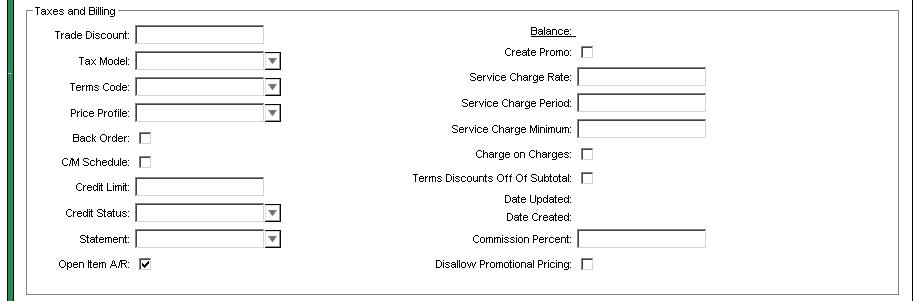 Trade Discount:
 This is an optional additional discount that can be applied to discountable items when billed on an invoice. The counterperson must select the
Apply button on the
Line Item Details window in the
Order Entry – Billing section to apply the discount.
Tax Model: Select the correct Tax Model for this customer from the dropdown.
Customer Tax Models must be set up prior to use in the Taxes task in the
Company section.
Terms Code: Select the desired Terms Code from the drop down box to be used when invoicing customers. Terms Codes must be set up prior to use in the
Terms Codes task in the
Company section. The Terms Code assigned to the invoice when it is created is used to determine the invoice due date, discounts, aging totals, statement information printed, etc.
Price Profile: Select the desired Price Profile from the drop down box to be used when pricing customer invoices. Customer pricing can be further customized using the
Special Pricing link from the
Edit Customer screen.
Ship-To Pricing:
Back Order: Select this box to maintain customer back orders. Back orders will be cancelled if this box is not selected.
C/M Schedule: Select this box to track qualified customer sales for submission to suppliers for rebates.
Credit Limit: Enter the customer’s credit limit. If a customer exceeds their credit limit, the
Balance value is displayed in red in the
Order Entry – Billing tasks.
Credit Status: Select the desired Credit Status from the drop down box. This field is display and reporting purposes only. Credit Status codes must be set up prior to use in the
Data Maintenance task in the Company section (and should be done only with CDN Software Support). Default values are
Bad, Good, Over, or
.
Statement: Select the desired Statement type from the drop down box. This field is use in the
Statements task to select and print the desire Statement type. Statement type codes must be set up prior to use in the
Data Maintenance task in the
Company section (and should be done only with CDN Software Support). Default values are
Weekly, Monthly, Exempt (do not print a statement), or
.
Statement Preference:
Balance: This is the customer’s current total balance (including future due invoices).
Open Item AR: Select the Open Item Accounts Receivable box to print the customer’s statement in open item format (open invoices from the previous statement are printed within the detail portion of the new statement). If the Open Item Account Receivable box is not selected, the customer’s statement will be printed in balance forward format (a
Balance Forward summary line is printed for the total of the open invoices from the previous statement). Please refer to the prior
Sample Statements section for examples. Open Item detail is kept for the customer whether this box is selected or not.
Create Promo: Reserved for future use.
Service Charge Rate: Enter the Service Charge Rate as a percentage (i.e. key 1.5 for a 1.5% rate) to be charged on invoices that become past due.
Service Charge Period: Reserved for future use.
Service Charge Minimum: Enter the round-up lowest amount to charge as a service charge for an invoice. The Service Charge Minimum amount is applied if the calculated Service Charge amount is less than the minimum.
Charge on Charges: Select this box if you wish to apply Service Charges on past due Service Charges.
Date Updated: This is the date of the last time maintenance was performed on the current customer record and is automatically maintained by the CDN software.
Date Created: This is the date that this customer record was created on CDN and is automatically added by the CDN software.
Commission Percent:
Disallow Promotional Pricing:
Require PO Number:
Display List Price on Documents:
Do Not Allow Being Billed Directly: This option will prevent the customer from being selectable on most POS screens. The customer will still be displayed in the Bill-to dropdown, and a message will indicate why it is not selectable. ComCept .Net does not honor this setting.
One use case for this feature is if the customer orders directly from the manufacturer and that order is sent to ComCept.
Messages
 Messages
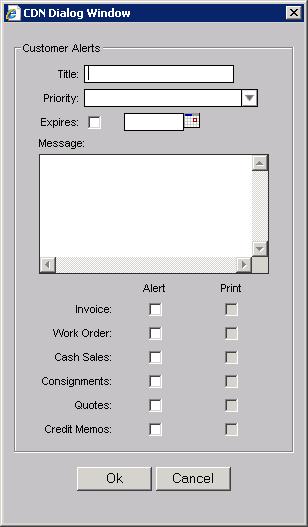
Customer Alerts:
Messages
Customer Alerts: The Customer Alerts are messages and memos that can be displayed or printed when selecting customers in the Order Entry – Billing tasks. Multiple Customer Alerts can be maintained for a customer.
Note: The printing of Customer Alerts is reserved for future use.
Select the
Add button to add a new Customer Alert.
Select the
Edit button to edit an existing Customer Alert. You must first select the customer alert to be modified.
Select the
Delete button to delete an existing Customer Alert. You must first select the customer alert to be deleted.
Customer Alerts Dialog Window
The Customer Alerts CDN Dialog Window will display if the Add or Edit buttons were selected.
 Customer Alerts Dialog Window
Title:
Customer Alerts Dialog Window
Title: Enter the name or title for the customer alert that will be displayed in the
Customer Alerts box.
Priority: Select the desired Priority from the drop down box (i.e.
Critical, High, Medium, or
Low). The priority determines the Icon that is displayed in the pop-up dialog window.
Expires: Select this box to set an expiration date for the Customer Alert.
Enter the Expiration date in this format 05/31/2010 or select the Calendar icon to use the Calendar screen to select the date:
Message: Enter the message just as it is to be displayed or printed.
Note: The printing of Customer Alerts is reserved for future use.
Alert section checkboxes: Select the boxes that correspond to the
Order Entry – Billing task with which this Customer Alert is to be displayed as an alert at the time of order entry.
Print selection boxes: Reserved for future use. Select the boxes that correspond to the
Order Entry – Billing task on which this Customer Alert is to be printed.
The
Order Entry – Billing tasks with which this Customer Alert can be associated are as follows:
- Consignments (reserved for future use)
Select
(Ok) to save changes or
(Cancel) to discard changes and exit.
Contacts
 Contacts
Customer Contacts:
Contacts
Customer Contacts: Customer Contacts can be an individual, department, service, etc. for which a name, address, phone number, etc. needs to be kept on file. Multiple Customer Contacts can be maintained for a customer.
Select the
Add button to add a new Customer Contact.
Select the Edit
button to edit an existing Customer contact. You must first select the customer contact to be modified.
Select the Delete
button to delete an existing Customer Contact. You must first select the customer contact to be deleted.
Contact Info Dialog Window
The customer Contact Info CDN Dialog Window will display if the Add
or Edit
buttons were selected.
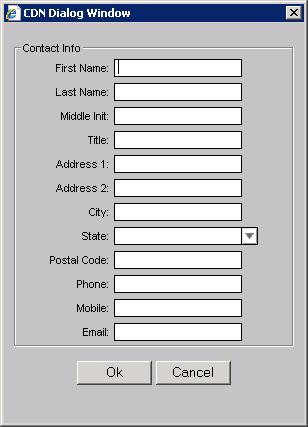
Contact Info
First Name:
Enter the first name for the contact. This field is displayed in the Contacts
list window.
Last Name:
Enter the last name for the contact. This field is displayed in the Contacts
list window.
Middle Init:
Enter the middle initial for the contact.
Title:
Enter the title for the contact. This field is displayed in the Contacts
list window.
Address 1:
First line of the street address.
Address 2:
Second line of the street address.
City:
The city where the contact is located.
State:
The state where the contact is located.
Postal Code:
The contact’s postal code (i.e. zip code).
Phone:
The contact’s phone number.
Mobile:
The contact’s mobile or cellular phone number.
Email:
The contact’s email address.
Select Ok
button to save changes or Cancel' button to discard changes and exit.
Customer Tax Status
 Customer Tax Status
Tax Exemptions:
Customer Tax Status
Tax Exemptions: Tax Exemptions can be
Items, Item Tax Groups, or
Customer Tax Models that are to be taxed differently than the
Tax Model selected for this customer. These sales Tax Exemptions give the ability to correctly tax invoices for individual customers in the
Order Entry – Billing tasks. Multiple Tax Exemptions can be maintained for a customer.
Item Tax Groups and
Customer Tax Models must be set up prior to use in the
Taxes task in the
Company section.
Select the
Add button to edit an existing Tax Exemption. You must first select the tax exemption to be modified.
Select the
Edit button to edit an existing Customer contact. You must first select the customer contact to be modified.
Select the
delete button to delete an existing Tax Exemption. You must first select the tax exemption to be deleted.
Exemption Information Dialog Window
Add/Edit Tax Exemption Information
Exemption Category: Select the desired tax exemption category from the drop down box:
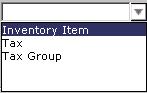
- Tax: Use to select a Customer Tax Model. A specific tax - customers are normally taxed at state and local level, but something allows a specific customer an exemption at one of those levels. Not very common.
- Inventory Item: Use to select an individual inventory item number. No tax applied to a specific item regardless of any other settings. Very rare.
- Tax Group: Use to select an Item Tax Group. Taxable and Selectively Taxable traditionally.
Description: This drop down box is used to select the desired value for the Tax Exemption. The values displayed change depending on which
Exemption Category was selected.
- Tax Description: Select the desired Customer Tax Model.
- Inventory Item Description: Select the desired inventory item number.
- Tax Group Description: Select the desired Item Tax Group.
Exemption Number: Enter the customer’s tax exemption number that was issued to them by the taxing authority for this exemption.
Select
(Save) to save changes or
(Cancel) to discard changes and exit.
Note: Be very careful with this
Tax Exemption setup because the taxing authority usually holds your company, and not your customer, liable for sales tax not collected. Your company may be held liable even if a customer is tax exempt but you have failed to comply with the taxing authority’s directions regarding documenting customers as tax exempt (i.e. copy of the customer’s current tax exemption certificate on file at each location the customer buys from, etc.).
To save the information keyed and actually create the new customer record, select the
Save or the
Save and Close action buttons or the Save or Save and Close options located on the drop down menu
Actions.
Edit Action
To edit or inquire into a Customer, you must first select the desired customer from the list of customers returned by the
Search action (see below) or from the
List All action.
This is done by selecting the desired customer followed by one of the actions below:
- The Edit Customer option from the drop down menu Actions.
- Double clicking the desired customer search line.
- Pressing the (Enter) key.
The following screen displays the information for an existing customer. Please note that not all of the information fits on one screen. Use the scroll bar on the far right of the CDN screen to view the rest of the customer’s information.
The fields on the
Edit Customer screen are the same as the
Add New Customer screen fields described previously.
The screen/menu actions below are described in the following sections:
Add New Action
Select the
Add New action button (
Add New Customer from the drop down
Actions menu) to save or discard changes keyed and change to the
Add New Customer screen. The following confirmation window is displayed if and data was keyed:
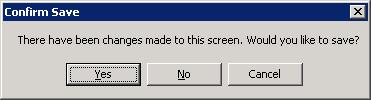
- Select the (Yes) button to save changes.
- Select the (No) button to discard changes.
- Select the (Cancel) button to return to the Add New/Edit Customer screen and continue making changes.
Save Action
Select the
Save action button (
Save from the drop down
Actions menu) to save changes and remain in the current customer record.
Save & Close Action
Select the
Save & Close action button (
Save and Close from the drop down
Actions menu) to save changes and return to the
Search for Customers screen.
Close/Search Action
Select the
Close action button (
Search from the drop down
Actions menu) to save or discard changes keyed and return to the
Search for Customer screen. The following confirmation window is displayed if data was keyed:
- Select the (Yes) button to save changes.
- Select the (No) button to discard changes.
Select the
(Cancel) button to return to the
Add New/Edit Customer screen and continue making changes.
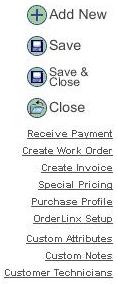
Receive Payment Link
Select the
Receive Payment link to call up the current customer within the
Payments task (described previously). The
Open Batches dialog window will be displayed first so that the batch to which this payment is to be added can be selected.
Create Work Order Link
Select the
Create Work Order link to call up the current customer within a new
Work Orders task (described in the
Order Entry – Billing chapter).
Create Invoice Link
Select the
Create Invoice link to call up the current customer within a new
Invoices task (described in the
Order Entry – Billing chapter).
Special Pricing Link
Select the
Special Pricing link to call up the current customer within the
Customer Special Pricing Profile Maintenance dialog window (described below).
Customer Special Pricing Profile Maintenance 
Customer Special Pricing Profiles are used to customize the customer standard pricing. The customer standard pricing is determined by the
Price Profile field selection within the
Customers task screens. Pricing Profiles are maintained within the
Pricing Profiles task in the
Company group.
The
Customer Special Pricing Profile Maintenance dialog window can only be accessed by selecting the
Special Pricing link from within the
Edit Customer screen. The Customer Special Pricing Profile fields are the same as the fields in the body of the
Pricing Profiles task in the
Company group.
Customer Special Pricing entries can be by
Item, Manufacture, Product Group, and
Product Line.
Please refer to the
Pricing Profile Help TextPricing Profiles .
Purchase Profile
This feature is used to limit the items the customer can purchase in CollisionLinx or Mobile Suite.
CollisionLinx Setup
The
CollisionLinx Setup link is used to enter the necessary information a customer needs inorder to access CollisionLinx .
CollisionLinx Login Documentation
Custom Attributes
The
Custom Attributes link is used to assign attributes to customers. This feature is mainly used for reports.
Custom Notes
The
Custom Notes link is used to enter a note for a particular customer. This note will appear in the
Customer Notes section of all POS screen.
Customer Technician
The
Customer Technician link is used to create and modify technicians that the customers use. The Technicians appear in the Technician dropdown of all applicable POs screens and CollisionLinx.
Search Action
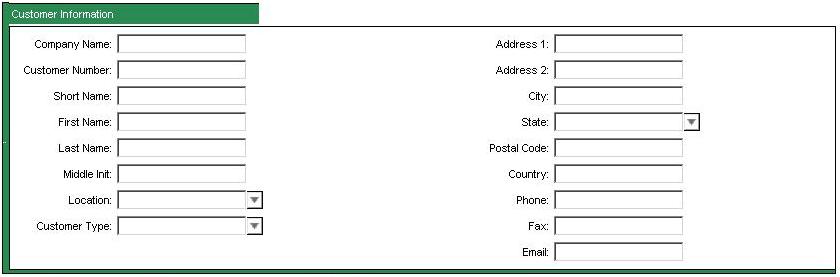
Search For Customers Screen Fields
The search screen fields are used to build a filter so that the
Search action (
Filter from the drop down
Actions menu) will display the desired customers. Enter the beginning portion or the entire value in any or all of the desired search fields listed below. Some fields have drop down boxes to assist in entering values by displaying valid entries. These fields are indicated with the down arrow button (i.e. the
Location, Customer Type, and
State fields).
Company Name: This is the legal company name for the customer.
Customer Number: This is a user defined number used to reference the customer. This field is often pre-loaded during conversions with the old customer number from your company’s prior computer system.
Short Name: This is a descriptive short name for the customer. This field is often pre-loaded during conversion with the old customer alpha from your company’s prior computer system.
First Name: This is the first name of the owner or manager.
Last Name: This is the last name of the owner or manager. Location: Use the drop down box to select the location that services this customer.
Middle Init: This is the middle initial of the owner or manager.
Customer Type: Use the drop down box to select the desired customer type.
Address 1: This is the first line of the customer’s address.
Address 2: This is the second line of the customer’s address.
City: This is the city for the customer’s address.
State: This is the state for the customer’s address.
Postal Code: This is the zip code for the customer’s address.
Country: This is the country for the customer’s address.
Phone: This is the customer’s main phone number.
Fax: This is the customer’s main fax number.
Email: This is the customer’s main e-mail address.
Note: The less information keyed to get the desired filter the better. Use the fewest search fields to get the filter you desire. Also, if you key only the beginning portion of a field, all items beginning with the value entered will be selected.
In this example the search field used was the
Company Name with the first part if the name (i.e “Dave”) entered.
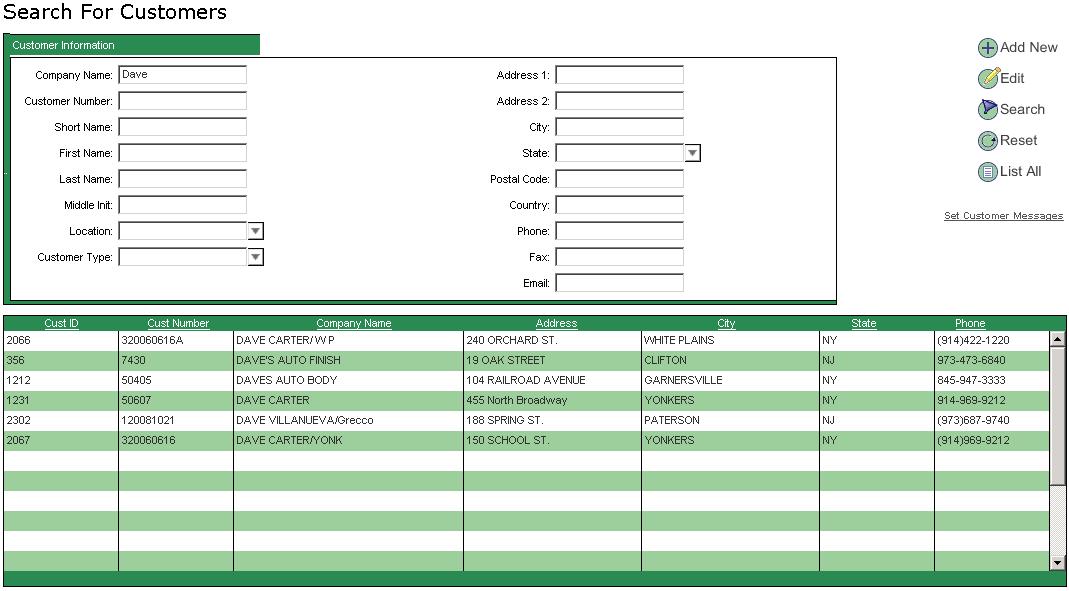
The
Search button is then selected and the two customers that pass the filter are displayed in the record display area of the screen.
You can also select the
Filter option located on the drop down menu
Actions.
Reset Action
Select the
Reset action button (
Reset Search from the drop down
Actions menu) to clear the Search Screen and return it to the screen defaults so that a new search can be performed. This is the same as leaving the Search Screen and then again selecting the same Search Screen Task.
List All Action
Select the
List All action button (
List All from the drop down
Actions menu) to clear the Search Screen and return it to the screen defaults so that a new search can be performed. This is the same as leaving the Search Screen and then again selecting the same Search Screen Task.
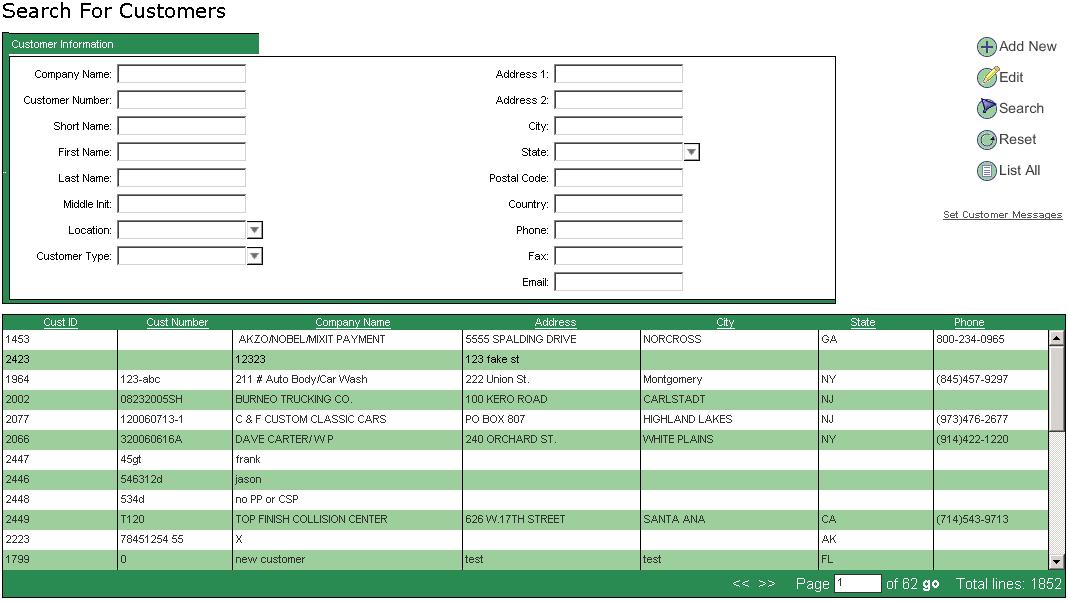
Note: This can take several minutes for large files. It is recommended that the Record
Search button be used in conjunction with as many search fields as is practical.
Select the heading link to sort the displayed customers (i.e.
Cust ID,
Cust Number, etc.)
Refresh Customer List
Select the
Refresh Customer List action link (
Refresh Customer List from the drop down
Actions menu) to refresh the customers on your local computer from the server. This will allow the local computer to access current data for customers that have be changed or added on other computers.