Page History: Receive Payments Help Documentation
Compare Page Revisions
Page Revision: 11/17/2011 03:24 PM
Receive Payments
The Receive Payments task is used to:
- Post payments received from customers or miscellaneous sources.
- Apply payments to customer accounts receivable invoices.
- Apply discounts to customer accounts receivable invoices.
- Reverse Bad Check payments received on customer accounts receivable and re-open invoices.
- Inquire into customer open accounts receivable detail and customer payment history.
Notes:
- When payments are entered, they are immediately applied to the customer account balances and statements whether or not the Payment Batch is posted. This is so the customer's accounts receivable balance and detail is as up-to-date as possible.
- If there is a problem deciding what invoices to apply a payment to, print the customer’s statement and use this as a worksheet to assist in determining how to distribute the payment and to document the reasoning used.

Select
Receive Payments from the
Navigation Bar or from the Drop Down Menu
Accounts Receivable.
Payments Screen
This is the
Open Batches screen with the
Payments screen in the background.
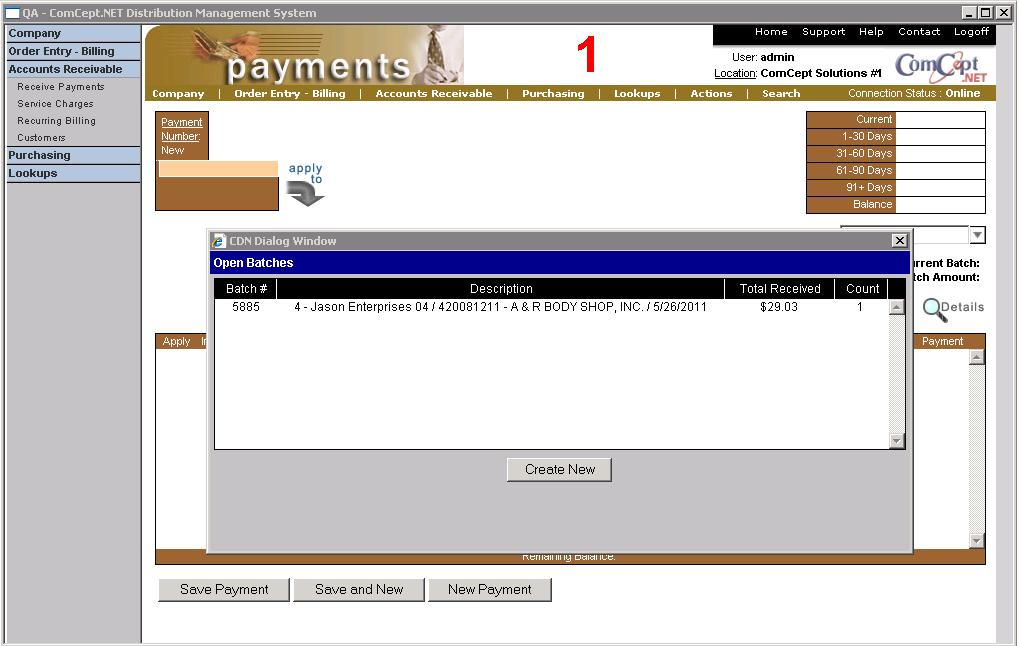
Each time you enter the
Payments task the
Open Batches dialog window is display.
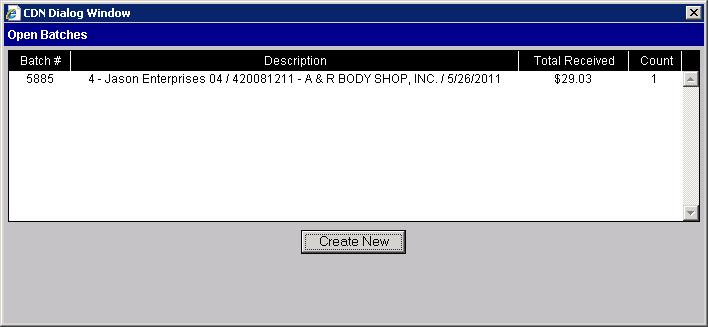
This window is used to either open an existing payment batch (i.e. select batch #5885) or start a new batch (i.e. select the
(Create New) button). The payments you post will then be grouped withiin the payment batch you selected.
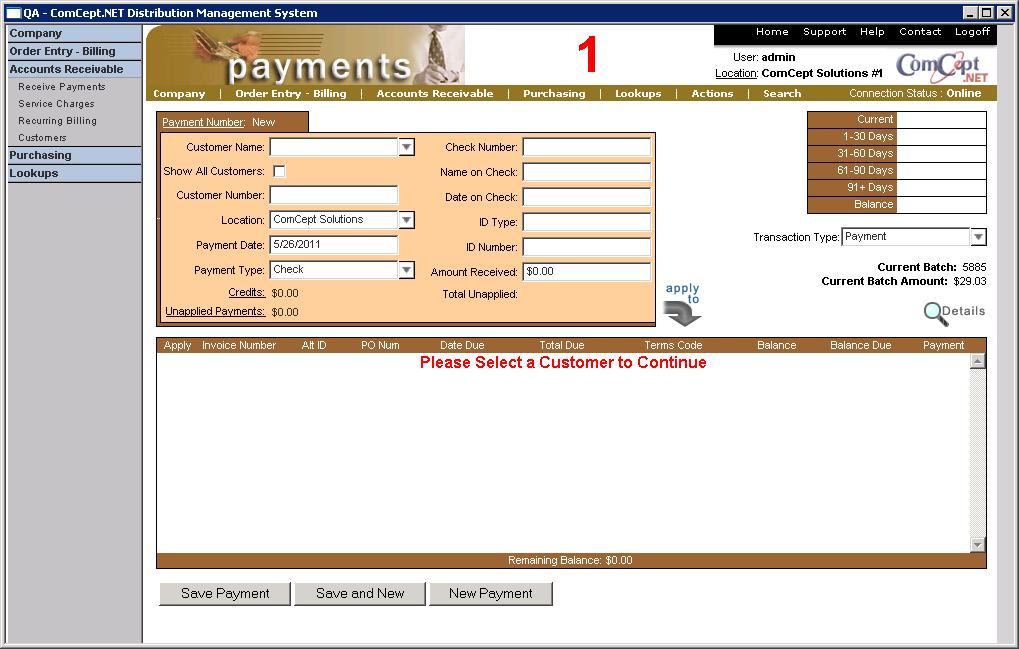
This shows the Payments screen (with the default
Transaction Type of "
Payment") after selecting open batch #2. The open batch number is indicated by the two fields on the right hand middle portion of the screen:
- Current Batch: 5885 – This is the batch number. New is displayed if you selected the (Create New) button in the Open Batches dialog window described previously.
- Current Batch Amount: $312.75 – This is the current amount of cash (cash, checks, etc.) applied in this open batch. This corresponds to the total bank deposit keyed so far into this batch.
The Payment Batch Number is used for posting and reporting payments grouped into these batches.
This second payments screen shows the
Transaction Type of "
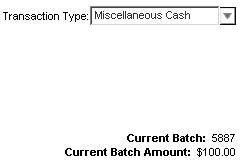
Miscellaneous Cash". This is used to post moneys collected that are not to be applied to any specific customer or open invoice in the accounts receivable. This is cash income from "other" sources (i.e. rent payment, bad debt settlement, etc.).
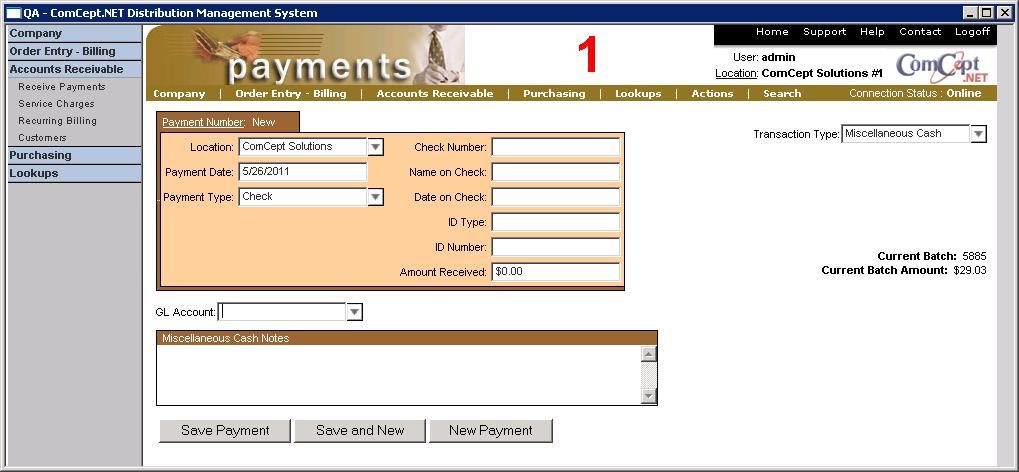
Use the
Transaction Type drop down box (located on the right hand middle portion of the screen just above the
Current Batch field) to select the
Miscellaneous Cash transaction type or to change back to the default
Payment transaction type:

Transaction Type - Payment
The Payment screen for transaction type
Payment is made up of four areas:
- Customer selection and payment information area:
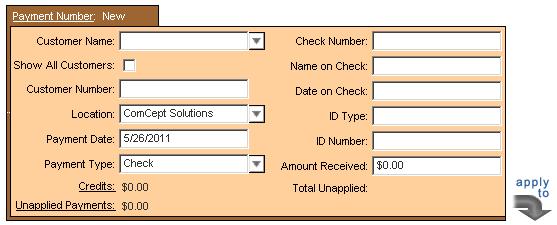
- Customer aging, payment transaction type, and batch information area:
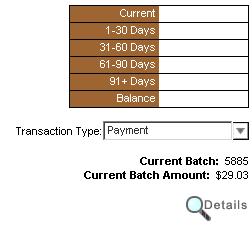
Payment Application Area:

Payment Button Area:

Note: The following sections are in the same order that the
(Tab) key follows during date entry.
Customer Selection and Payment Information Area
Located in this area are the customer selection fields, payment date, payment type, payment amount, etc fields (use the
Customer Name drop down box or the
Customer Number field to select the desired customer):
Payment Type: Check
 Payment Number:
 This is the payment number of the current payment. “New” is displayed until the payment is saved. The Payment Number along with its associated Payment Batch Number (described earlier) is used to identify payments. Use this link to search for and open previously saved payments.
Customer Name: Enter the customer to which the payment is to be applied. Select the desired customer using the drop down box:
- Begin typing the customer’s name.
- Use the up/down arrows to highlight the desired name.
- Then press (Tab) to select name or select with the mouse.

- Or select the drop arrow (or press the down arrow key) and scroll through the names.
- Then press (Tab) or use the mouse to select the customer.

After a customer has been selected the Customer Number, customer aging, account balance, unapplied Credits, Unapplied Payments, open invoices, and Remaining Balance are displayed. Show All Customers: Select this box to enable selecting customers that have been designated as in-active (the Is Active box is not selected in the Customers screen) or ship to only accounts.
Customer Number: This field will be filled if the
Customer Name was used to select the customer. Otherwise, enter the
Customer ID number assigned in the
Customers task to select the desired customer.
Location: This field is used to select the location the payment will be applied to. This field defaults to the customer default location.
Payment Date: Defaults to the current system date. This can be changed if desired.
Payment Type: Select the type of payment (i.e. cash, check, credit card) from the drop down box. The fields displayed in the second column of Customer Selection and Payment Information Area changes depending on this selection. The Payment Type of “Check” is the default.
Credits: This is the total of all unapplied credits for this customer. Select this link (click on the word
Credits) to add the unapplied credit detail to the top of the Payment Application Area (please see below).
Unapplied Payments: This is the total of all unapplied payments for this customer. Select this link (click on the word
Unapplied Payments) to add the unapplied payment detail to the top of the Payment Application Area (please see below).
Second Column Fields - Payment Type: Check
Check Number: Enter the customer’s check number.
Name on Check: Enter the name printed on the check.
Date on Check: Enter the date on the check.
ID Type: Enter the form of identification used (i.e. driver’s license, credit card, etc.).
ID Number: Enter the corresponding number on the ID used.
Amount Received: Enter the amount of the check to be applied to the customer’s accounts receivable.
Total Unapplied: This is a running balance of how much of the
Credits (if selected),
Unapplied Payments (if selected), and
Amount Received (if entered) that has not been applied in this payment.
Select the
Apply to button to automatically apply any remaining
Total Unapplied balance. The application starts with the oldest invoice until the
Total Unapplied balance is zero. Qualifying payment discounts calculated using the terms codes on the invoices will also be applied to these invoice.
Note: Discounts on partially paid invoices are not allowed and will be discarded once the payment is saved.
Payment Type: Cash
 Second Column Fields - Payment Type: Cash
Amount Received:
 Enter the amount of cash received to be applied to the customer’s accounts receivable.
Payment Type: Credit
 Second Column Fields - Payment Type: Credit
Card Number:
 Enter the credit card type and number.
Name on Card: Enter the name exactly as it appears on the credit card.
Expiration Date: Enter the expiration date as it appears on the credit card.
Amount Received: Enter the amount to be charged to this credit card and to be applied to the customer’s accounts receivable.
Customer Aging, Payment Transaction Type, and Batch Information Area 
After a customer has been selected, the customer’s current aging (calculated using the terms code for each invoice) and the customer’s account balance are displayed in the upper right hand corner of the
Payments screen.
 Current:
 The total of the customer’s open invoices that are current.
1-30 Days: The total open invoices that are 1 to 30 Days old.
31-60 Days: The total open invoices that are 31 to 60 Days old.
61-90 Days: The total open invoices that are 61 to 90 Days old.
91 + Days: The total open invoices that are 91 Days old and older.
Balance: The current total of all open invoices for this customer (qualifying discounts are NOT deducted from this balance).
Transaction Type: This is the type of payment. The default is
Payment (which is described in this section). The other option is
Miscellaneous Cash (which will be described in a later section).
Current Batch: The current batch number that is open (“New” designates a new batch which contains no saved payments).
Current Batch Amount: The total amount of payments saved in this batch. This amount will be zero for a “New” batch.
The details icon is one of the two ways to open the Discount Details Window for an invoice. This window is used to view and change the Current Discount amount, view and change the Current Payment amount, and view additional information for invoices in the Payment Application Area (described later). The invoice to be displayed must be highlighted before selecting the details icon.
Payment Application Area
The Payment Application Area contains all the open invoices for the selected customer. It will also display credits and unapplied payments if the
Credits and/or
Unapplied Payments links have been selected (described earlier in the
Customer Selection and Payment Information section).
Note: Credit and Payment balances are displayed without negative signs.
 Column Definitions
_
Apply: Select this box to mark the entry for application. The
Apply box is pre-selected when the
Credits and/or
Unapplied Payments links are first selected. De-select these entries that are not to be included in this payment.
Note: The discount to be applied to the invoice must be present (either automatically calculated from the invoice terms code or keyed manually) before this box is selected. If the box is selected before the discount is present, you can change the
Current Payment amount (described in the following
Discount detail Window section) to enable the entry of the desired discount -or- de-select the
Apply box, enter the desired discount, then re-select the
Apply box.
Invoice Number: The invoice number, credit number, or payment number for this entry.
Alt ID: This is the offline invoice number for this entry. An
Alt ID is present only if the invoice was created while CDN was in Offline Mode (described in the
Basics and the
Order Entry - Billing chapters).
PO Num: The customer’s Purchase Order number entered on the invoice.
Date Due: The date this entry is due as calculated using the terms code for the entry. The due date for Recurring Bills, payments, and credits is the same as the transaction date (because they are immediately available for application) and no due date is displayed. Also, discounts for Recurring Bills must be manually entered.
Total Due: The original total value of the entry (i.e. the total from a printed or saved invoice).
Terms Code: The terms code assigned to the entry when it was created. Payments are assigned a terms code of
PAYMENT and credits are assigned a terms code of
CREDIT.
Balance: The remaining balance due on the entry before the current payment is saved.
Balance Due: The remaining balance due on the entry showing the effect of the current payment and discount.
Payment: The payment amount being applied in this payment (discount are not included).
Note: Discounts given are not included in the
Payment column. The discount to be given can be determined by opening the
Discount Details Window (described below) or by calculating the difference between the
Balance column and the
Balance Due and the
Payment columns added together.
Remaining Balance: This is a running total of the invoices in the
Balance Due column. The
Balance Due total is reduced by discounts applied and as invoices are selected for full or partial payment.
Note: The following formula reconciles the
Remaining Balance with the total
Balance (in the
Customer Aging, Payment Transaction Type, and Batch Information Area). This must be done before any payments are applied within this payment because the total
Balance is not updated until the payment is saved:
Remaining Balance - all
Credits - all
Unapplied Payments + all qualifying discounts (determined by totaling the difference between the
Balance and the
Balance Due columns)
= Total
Balance.
(Remember, this formula only works if the
Payment column is equal to zero for all invoices entries.)
Discount Details Window
The invoice Discount Details window is opened by selecting the link in the
Balance Due column in the Payment Application Area or by highlighting the desired line and then selecting the
Details icon in the
Customer Aging, Payment Transaction Type, and Batch Information area. The invoice Discount Details window is used to view and change the Current Discount amount, view and change the Current Payment amount, and view additional information on invoices in the Payment Application Area.
Note: The invoice Discount Details window will not open if a Credit or an Unapplied Payment is selected.
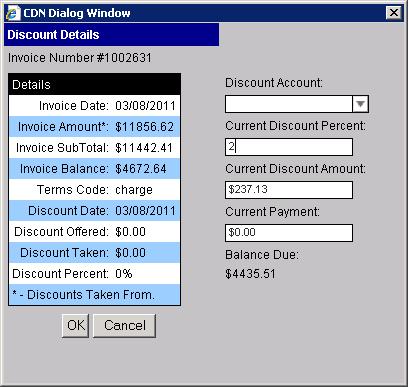 Invoice Number:
 The invoice number highlighted in the Payment Application Area.
Invoice Date: The date of the invoice.
Invoice Amount: The original total value of the invoice.
Invoice Balance: The remaining balance on the invoice before the current payment is saved.
Terms Code: The terms code assigned to the invoice when it was created.
Discount Date: The date the invoice must be paid by to receive the discount as specified by the
Terms Code.
Discount Offered: The discount dollar amount offered as specified by the
Terms Code:
Discount Percent: The discount percent offered as specified by the
Terms Code.
Discount Account: Select the general ledger account for recording the discount for this invoice. Leave “blank” for the default.
Current Discount Percent: The discount percent to be taken on this invoice. This field is pre-filed with the
Discount Percent as specified by the
Terms Code for this invoice provided the payment is being made on or before the
Discount Date. Changes to this field will cause the
Current Discount Amount and the
Balance Due fields to be recalculated.
Current Discount Amount: The dollar amount discount to be taken on this invoice. This field is pre-filled with the
Discount Offered as specified by the
Terms Code for this invoice provided the payment is being made on or before the
Discount Date. Changes to this field will cause the
Current Discount Percent and the
Balance Due fields to be recalculated.
Current Payment: The amount of payment to be applied to this invoice. This field is pre-filled if the
Apply box was selected before opening the invoice
Discount Details window. Changes to this field will cause the
Balance Due field to be recalculated. If the
Apply box was selected before the
Current Discount Amount was entered, the
Current Payment amount will need to be reduced to allow for the discount.
Balance Due: The remaining balance due on the invoice showing the effect of the
Current Payment and
Current Discount Amount.
Note: You must select the
(OK) button to save the changes made to this screen. Select
(Cancel) to discard the changes.
Payment Actions Buttons

These are the payment action buttons used to save or discard the changes made to the
Payments screen.
(Save Payment) Saves the current payment and then re-displays the
Payments screen showing the payment just saved.
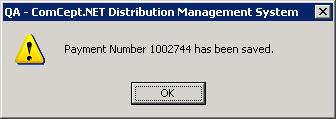
(Save and New) Saves the current payment, displays the “Payment Number xxx has been saved.” dialog window, and then displays an empty
Payments screen.
(New Payment) Discards the changes made and displays an empty Payments screen. There is no warning that changes will be lost.
Applying Credits and Unapplied Payments
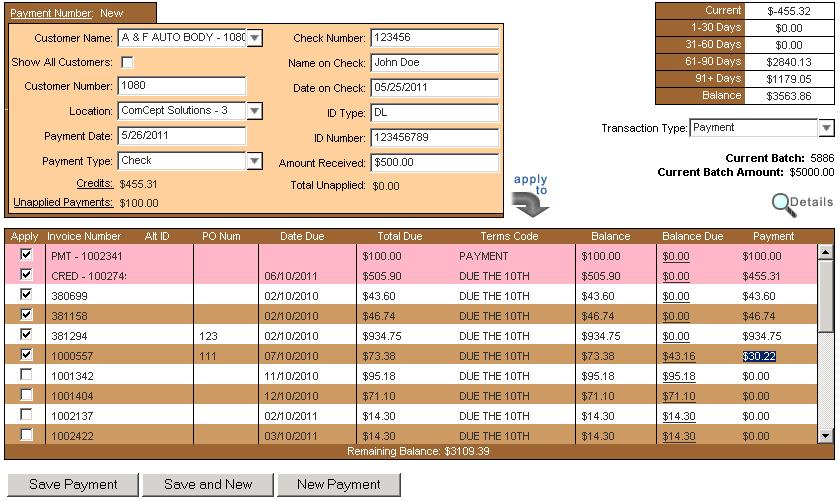
This example shows the payment application area after the
Credits and
Unapplied Payments links have been selected. Notice how these transactions are included at the top of the Payment Application area and that the
Apply box is pre-selected.
If a credit or unapplied payment is not to be applied in the current payment, simply de-select the
Apply box and the entry will be left unapplied for latter use on another payment.
The
Total Unapplied amount increases when you select these links and then changes as you select or deselect the
Apply box on the individual transactions in the
Payment Application area.
Note: When unapplied payments are applied to invoices, the invoice application detail prints on the
Payment Batch Detail report with the payment that originally created the unapplied payment (even if in a different payment batch) and NOT with the payment where the unapplied payment was applied to the invoices. This is because the
Payment Batch Detail report is a deposit slip detail report and not a payment application history report. Refer to the Payment Search by Customer section for how to recall all the payments for a customer so that they can be viewed one at a time to see on which batch, and how,
Unapplied Payments and
Credits are applied.
Payment Example

This example shows:
- $500.00 received in cash and entered in the Amount Received field.
- The unapplied payment PMT – 1002341 for $100.00 selected.
- The credit CRED – 1002745 for $455.31 selected.
- This Total Unapplied amount of $1,055.31 is then applied to pay the remaining balance of invoices #380699, 381158 and to partially pay invoice #1000557.

The invoice Discount Details for Invoice #1002631 shows:
- A 2% discount of $23.34 applied. This was keyed manually (because the Terms Code for this invoice did not specify a discount).
- The balance of this invoice ($1,143.70) was then paid by entering the balance in the Current Payment field or by closing the invoice Discount Details window (the OK button was selected) and then selecting the Apply box. The Current Payment amount could have been keyed before closing the Discount Details window.
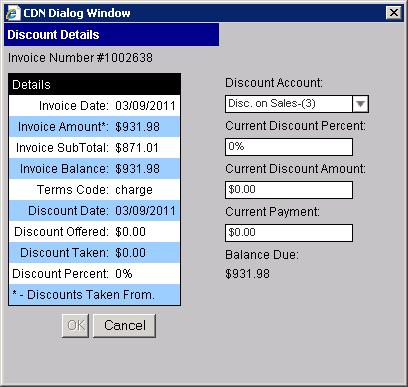
The invoice Discount Details for Invoice #2 shows:
- No discount was keyed for this invoice nor calculated from the invoice Terms Code. Remember, since this invoice is not being paid in full (there is a remaining Balance Due amount), any discount keyed would NOT have been posted to the invoice anyway.
- The partial payment of $60.38 was keyed in the Current Payment field leaving a Balance Due of $95.62. This partial payment was made by selecting the Apply box on the Payment Application area. It could have been keyed manually into the Current Payment field using this window.
Keying Discounts
The following are generalities about keying discounts for invoices:
- The default discount is automatically determined by the Terms Code that was in place when the invoice was created provided the invoice is being paid on or before the Discount Date.
- The discount amount can be changed at the time of payment application.
- To change the discount amount or to post a partial payment, select the Balance Due amount field or highlight the desired invoice and then select the Details icon in the Customer Aging, Payment Transaction Type, and Batch Information area to open the Discount Details window and then make the desired adjustments.
- Do not post a discount on a partial invoice payment. It will look correct on the Payments screen but the discount will not be retained when the payment is saved. The Balance Due must be $.00 for the Current Discount Amount to be recorded.
- Do not post a “discount only payment” for an invoice. It will look correct on the Payments screen but will not be retained when the payment is saved. There must be a Current Payment amount entered (even if it if for only $.01) in conjunction with a Current Discount Amount in order for the discount and payment to be recorded.
- The discount must be changed one invoice at a time (an exception, which is described below, is a “bulk” discount for a group of invoices that was not reflected in the Terms Codes).
- To post a “bulk discount” to a customer’s account, post the discount to a large enough invoice (or invoices) to cover the entire discount for this payment leaving some amount on the invoice (or invoices) to be entered as a Current Payment to complete the payment.
- The discount must be changed before selecting the Apply box for the invoice or the Current Payment amount will need to be reduced manually to allow for the discount. If a discount and payment is keyed that is greater than the Balance Due for the invoice, a negative Balance Due will be created for the “over payment”.
Saving an Unapplied Payment
An Unapplied Payment is created anytime a payment is saved with any remaining
Total Unapplied balance.
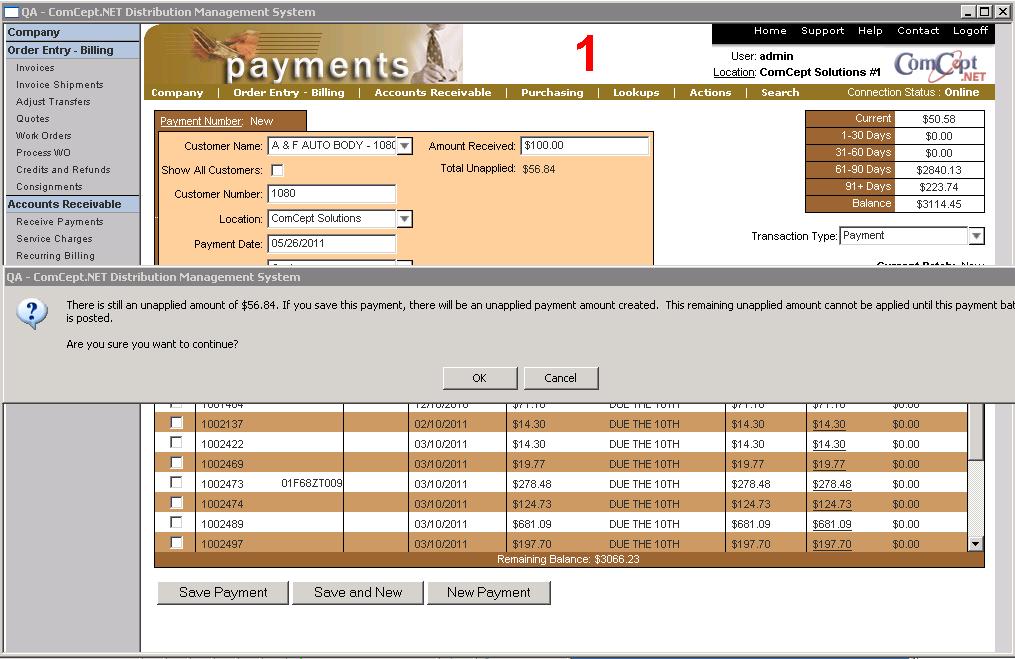
This screen shows a cash payment of $50.00 that will be posted as an unapplied payment.
The Unapplied Payment warning window is displayed when the
Save Payment or
Save and New button is selected and there is still a
Total Unapplied amount. If this amount can be applied to more invoices, select
Cancel to return to the Payment Screen and continue selection invoices. If not, select
OK to create an Unapplied Payment transaction.

Every saved unapplied payment is assigned a Payment Number. The full id for this transaction is
PMT – 1002747.
Transaction Type - Miscellaneous Cash
The Payment screen for transaction type
Miscellaneous Cash is made up of four areas:
- Payment Information Area:
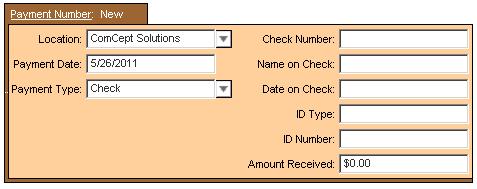
payment transaction type, and batch information area:
General ledger account selection and notes area:

Payment Actions buttons:

Note: The following sections are in the same order that the
(Tab) key follows during date entry.
Payment Information Area
Payment Type: Check
 Payment Number:
 This is the payment number of the current payment. “New” is displayed until the payment is saved. The Payment Number along with its associated Payment Batch Number described earlier is used to identify payments. Use this link to search for and open a previously saved payment.
Location: Store location the payment will be applied to.
Payment Date: Defaults to the current system date. This can be changed if desired. Payment
Payment Type: Select the type of payment (i.e. cash, check, credit card) from the drop down box. The fields displayed in the second column of Payment Information Area changes depending on the selection. The Payment Type of “Check” is the default.
Second Column - Payment Type: Check
Check Number: Enter the customer’s check number.
Name on Check: Enter the name printed on the check.
Date on Check: Enter the date on the check.
ID Type: Enter the form of identification used (i.e. driver’s license, credit card, etc.).
ID Number: Enter the corresponding number on the ID used.
Amount Received: Enter the amount of the check received as Miscellaneous Cash.
Payment Type: Cash
 Second Column - Payment Type: Cash
Amount Received:
 Enter the amount of cash received as Miscellaneous Cash.
Payment Type: Credit
 Second Column - Payment Type: Credit
Card Number:
 Enter the credit card type and number.
Name on Card: Enter the name exactly as it appears on the credit card.
Expiration Date: Enter the expiration date as it appears on the credit card.
Amount Received: Enter the amount to be charged to this credit card and received as Miscellaneous Cash.
Customer Aging, Payment Transaction Type, and Batch Information Area 
 Transaction Type:
 This is the type of payment. The default is
Payment (which was described in an earlier section) and the other option is
Miscellaneous Cash (which is described in this section).
Current Batch: The current batch number that is open (“New” designates a new batch which contains no saved payments).
Current Batch Amount: The total amount of payments saved in this batch. This amount will be zero for a “New” batch.
General Ledger Account Selection and Notes Area 
 GL Account:
 Select the general ledger account number from the drop down box to which this payment is to be posted.
Miscellaneous Cash Notes: Enter notes in this free-form field to describe the payment.
Payment Actions Buttons

These are the payment action buttons used to save or discard the changes made to the
Payments screen.
(Save Payment) Saves the current payment and then displays
Payments screen showing the payment just saved.
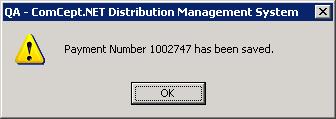
(Save and New) Saves the current payment, displays the “Payment Number xxx has been saved.” dialog window, and then displays an empty
Payments screen.
(New Payment) Discards the changes made and displays an empty
Payments screen. There is no warning that changes will be lost.