Page History: Receipt Worksheet
Compare Page Revisions
Page Revision: 12/27/2011 03:15 PM
Opening Screen
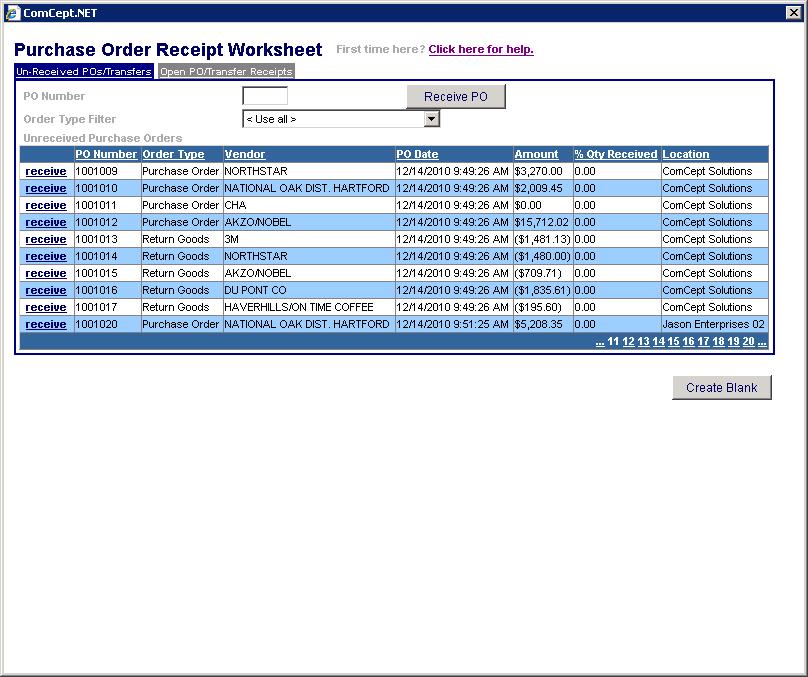
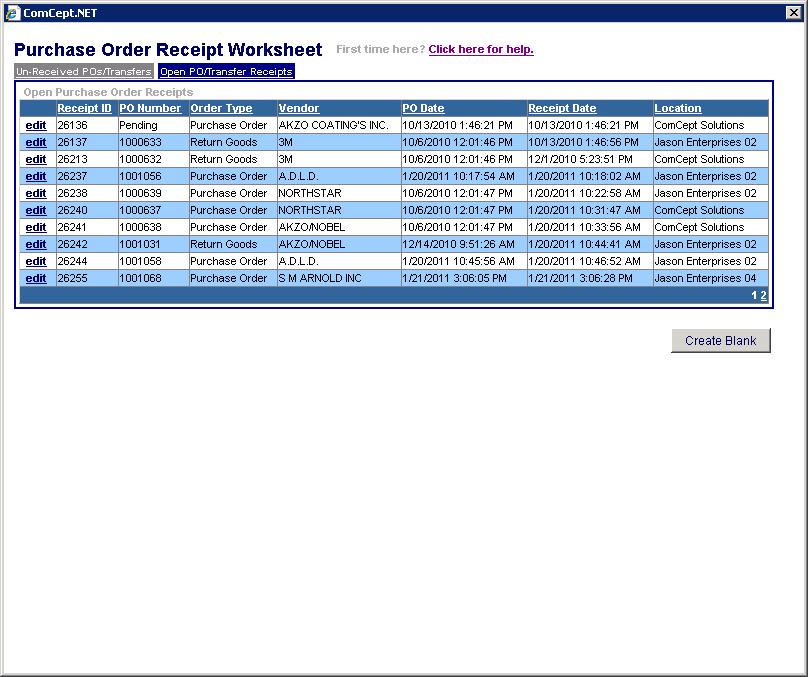
- The opening screen has two sections. The screen defaults to Un-received POs/Transfers. To access worksheets in progress, select the Open PO/Transfer Receipts tab.
- At the top is a PO Number Textbox along with a “Receive PO” button that allows you to enter a specific PO number, if known, and receive it directly. POs/Transfers all ready in progress in the “Open PO/Transfer Receipt” section may not be accessed in this manner.
- The Un-received PO’s/Transfers list on the screen shows all Purchase Order and Transfer Orders that are currently available to be received. You can receive any particular PO in the list by clicking on the “receive” link embedded in the left-hand column of the grid.
- The Open PO/Transfer Receipt list shows you all the currently open PO Receipt Worksheets you have in progress. Any one of these can be accessed for editing by clicking on the “edit” link button embedded in the left-hand column of the grid.
Note: Any receipt located in this section cannot be received in any other Receive PO function. This is done to ensure that products on a PO or transfer may not be received more then once. - The sort order can be changed on either screen by clicking on the column header.
- You can filter the Un-received portion of the screen by order type. Followed by further filtering by Vendor in the case of PO's and Return Goods Orders. If Order Type filter is set to transfer your can further filter by Shipping location.
Rules
- Only “Open” Purchase Orders/Return Goods and “Released” Transfers will appear in the List of orders available for receipt. Closed PO’s and Transfers cannot be accessed from this section.
- As soon as an order has an Open PO Receipt in progress, it will not appear in the Un-received section unless the current Receipt is Finalized with Back-Ordered line items, or the Receipt Worksheet is cancelled entirely.
Un-Received POs/Transfers Screen

Open PO/Transfer Receipt Screen

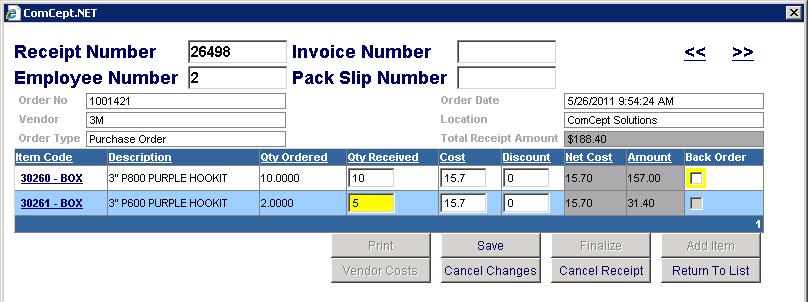
Edit Purchase/Transfer Order Receipt Worksheet Screen
Basic Functionality
- The top of the screen is the navigation area, displaying a PO Receipt Textbox which allows users to navigate directly to a specific Open PO Receipt Worksheet if they know the number by typing in the number and pressing the key.
- Also, there is another form of navigation available at the top of the screen in the form of click-able double arrows that allow you to move through all the Open PO Receipts on the list screen in PO Receipt number order.
- Next is the Employee ID TextBox. This field is required for a user to finalize the PO Receipt and will preserve on the Receipt header record the user who ultimately received the order.
- The PO Receipt details datagrid displays all the line items for the PO Receipt, allowing you, within the grid, to modify the cost of the item, the quantity that was actually received, and the percentage discount off of the cost of the item.
- Series of buttons at the bottom of the screen:
a)'“Save” button -- Saves all the modified data from the UI to the database. Saves are also performed when changing pages and when using “Return to List”.
b)
'“Finalize” button – Completes the work of the PO Receipt by updating the Header, the original PO header and details, and the inventory records.
c)'“Cancel Changes” button – Cancels all the UI changes made to the screen and refreshes it.
d)
'“Cancel Receipt” button – Cancels the receipt by removing it from the database and returns the PO to the “Un-received Purchase Orders” to be received at a later time. No changes made to any values will be saved if this is done.
e)“Return To List” button – Returns the user back to the original Open POs and PO Receipts List screen. The PO being received will now be located in the “Open PO/Transfer Receipt” section.
Rules
- Upon leaving a field where changes are made, the colors of the changed field and row will change to yellow showing that any calculated values in that row are no longer valid.
- The “Save” button defaults to disabled when you first come to the screen. It will become enabled as soon as fields on the screen are changed, and the “Finalize” button will become disabled to show that you cannot finalize a Receipt with un-saved changes.
- When you click the “Cancel Receipt” button a box will pop-up allowing you change your mind and reminding you that this action cannot be undone.
- Before the PO Receipt can be fully Finalized, you will need to enter a valid Employee Number to record that you where the one responsible for changing inventory values.
PO/Transfer Receipt Worksheet Screen

Tech Tips
- Changing Purchase Price: To modify a price where a discount % is currently displayed be sure to clear the discount % field for that item as well. Actual purchase price with discounts applied or prices modified on original PO are located in the “Net Cost” column.
- Use the “Tab” key for quick navigation within the Receipt Worksheet, Space bar to remove the check mark in the back order column.
- Back-orders of individual items may be cancelled directly from the Receipt Worksheet when un-checking the Back-Order Flag.
- Item code may be selected to view pricing, on hand, on order, committed values within the item lookup window.
- Total dollar value of receipt is recalculated every time a save is performed.
- Saves are performed when selecting “Save”, changing page of receipt worksheet, or using "returning to list" tab. Saves to current page are also performed if you click on an item code to view an item number in the lookup.
- The double arrows at top of the screen are not for navigating from page to page within a Worksheet. They are used for navigating from one receipt worksheet to the next.
- You may now add items to an existing receipt while working with it. This can be used to correct an incorrectly shipped product from your Vendor. Example: Ordered 12 1435 but they shipped 12 1436. zero the qty on 1435 and use add item to add the 1436 to the PO receipt.