Page History: Categories Help Documentation
Compare Page Revisions
Page Revision: 06/22/2023 02:16 PM
Categories
Product hierarchy is where you maintain your item code category and classification. (Assignable to the Master Inventory records.) Product Groups allow the classification and sub-classification of items into cross-manufacturer categories, by Product Type you can determine Pricing, Reporting, and Order Generation parameters. The top-level Product Lines allow for the classification of products within Manufacturer Brands, with Sub-Lines allowing further granularity within those brands. A product line is a group of related products that fall into a unique product category or product brand.


Product Groups
Add a Product Group
Follow the steps below to add a new product group:
1. Select the
Add Group button.
2. Type the name of the new product group into the
Name field.
3. Type a description into the
Description field (Optional)
4. Type an alias into the
Alias field (Optional)
5. Select the
Save button.
Note: A product group alias is the name used when exporting data from ComCept.net to external partners.
Optional Select which existing Product Group will be the parent of the new product group. If there is no parent selected the root product group will become the parent.

Editing an Existing Product Group
With product groups you can edit the name, description, and alias.
1. Select the desired
product group by clicking on its name in the Product group tree
2. Edit the
Name (Optional)
3. Edit the
Description (Optional)
4. Edit the
Alias (Optional)
5. Select the
Save button. If you do not want to save the changes, select the Cancel button.

Deleting a Product Group
You can delete a product group, however there are exceptions that will prevent you from deleting a group. They are:
- The product group has a child,
- There are Items assigned to the product group.
Note: If you are trying to delete a that has an exception you will receive the following error:
Follow the steps below to delete a product group:
1. Select the desired
product group by clicking on its name in the Product group tree,
2. Select the
Delete button,
3. Select the
OK to save the deletion.

Product Line
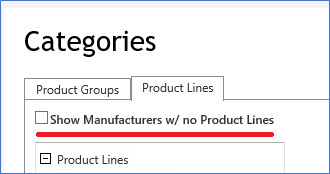
Show Manufacturers without product lines:
By default, only those manufacturers that have product lines in the system will show in the tree. By selecting the “Show Manufacturers w/no Product Lines checkbox,” all manufacturers in the system will show in the tree. This option allows the user to add product lines to a manufacturer that currently does not have any.

Add a New Product Line
To add a new product line, follow the instructions below:
1. Select the desired manufacturer by selecting their name in the product line tree. If the manufacturer is not present, select the Show Manufacturers w/ no Product Lines checkbox and search again. If the new product line is a sub product line, select the parent product line instead of the manufacturer.
2. Select the
Add Product Line.
3. Enter the product line
Name.
4. Type a description into the
Description field (Optional).
5. Select the
Save button.

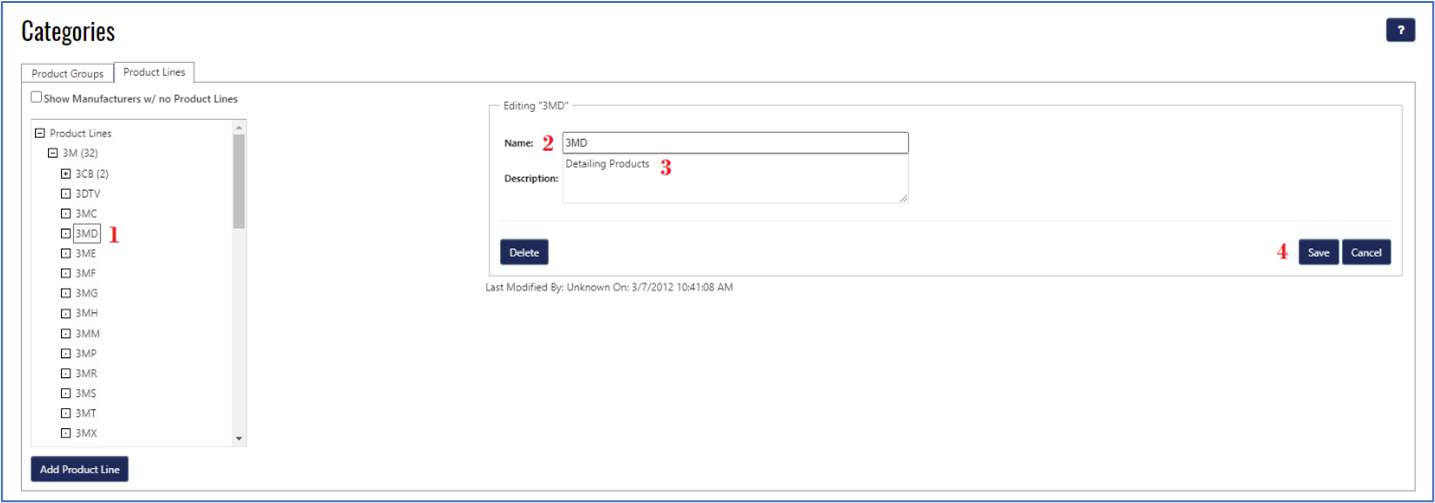
Editing an Existing Product Line
With product groups you can edit the name and description. Follow the steps below to delete a product group:
1. Select the desired product group by clicking on its name in the Product group tree.
2. Edit the
Name (Optional).
3. Edit the
Description (Optional).
4. Select the
Save button. If you do not want to save the changes, select the Cancel button.

Deleting a Product Line
Any product line can be deleted unless they are used by a product or are a parent to another product line.
Follow the steps below to delete a product group:
1. Select the desired product line by clicking on its name in the Product line tree.
2. Select the
Delete button,
3. Select the
OK to save the deletion.
