Page History: Master Inventory
Compare Page Revisions
Page Revision: 02/24/2017 11:44 AM
Master Inventory
This task is used to add, search, edit, or inquire into the master inventory on your system.
Note: Master inventory records must be created before most inventory functions can be used.
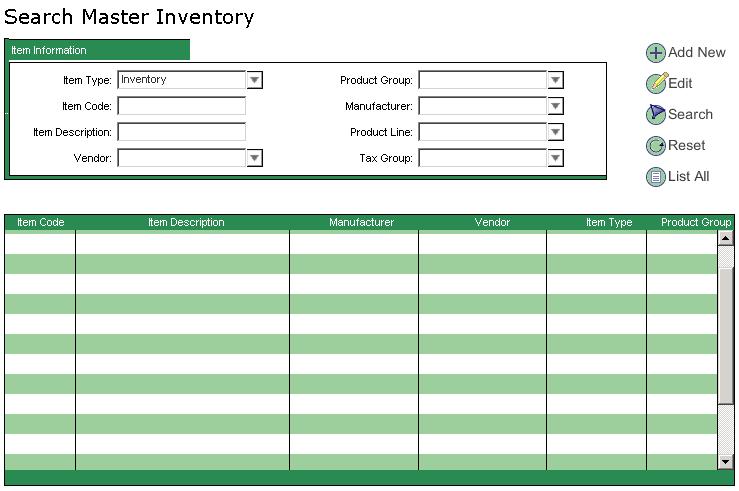
Search Master Inventory Screen
The
Search Master Inventory screen is the first screen that is displayed when the
Master Inventory task is selected. This screen is used to search for Master Inventory items that exist on the system. Individual items can then be selected for inquiry or editing from those displayed.
Also, new Master Inventory items can be added by using the
Add New action.

The work area or screen area is made up of the following three sections:
- The search fields (top center).
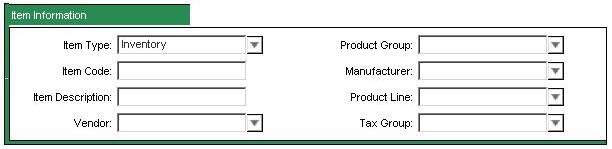
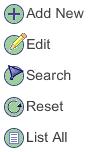
- The search action buttons (top right).
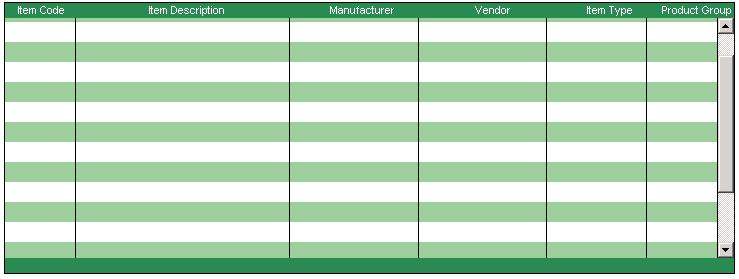
- The record display area (bottom half).
Add New Item Action
To add a new Master Inventory, select the
Add New action button from the
Search Master Inventory screen.
-or-
Select the
Add New Item option located on the drop down menu
Actions.
 Item Type: Inventory
 General Information
Item Type:
General Information
Item Type: Type of inventory used to determine how the item is processed. The Item Type also changes the layout of
Add New Item screen to display the fields that apply.
- Freight Item - no on hands balances maintained, no default sales price and cost of goods sold maintained.
- Inventory - on hand balances maintained, selling price and cost of goods maintained.
- Misc Credit - Allows the user to apply a payment to the Credit screen.
- Misc Payment - Allows the user to apply a payment to the invoice screen.
- Non Sales Debit - Used tp apply fees to a customer. This item type cannot be combined with other item types.
- Non-Inventory - on hand balances not maintained, selling price and cost of goods maintained.
- Miscellaneous - on hand balances not maintained, selling price and cost of goods not maintained.
Note: Use the Drop down box to display valid entries.

These values are maintained using the
Data Maintenance task described later.
Item Code: The inventory item number should be entered just as it is displayed on the package. Paint related items should be entered in the following format: 7500S/GL, 195S/PT, etc. Non-Paint items should be entered in the following manner: 2002, TLC555 etc. Generally, the item should represent the smallest size sold, with the exception of sand paper. You may include a vendor code as part of the item number if desired. Contact ComCept support for item number rules so that items created will be compatible with the items contained in the Price Pro price-updating service.
Item Description: The item description should be keyed as you want it to appear on all invoices and reports. Include descriptive information such as grit, size, color, count per sleeve, etc.
Item Short Desc: Future use.
Core Charge: This is the additional value of the used item. This is charged as a deposit to the customer until the used item is returned for a refund.
Vendor: This is the actual supplier of the item. It may be a local supplier or the actual manufacturer. This is used for purchasing, reporting, etc. These values are maintained using the
Vendors task described later.
Product Group: The product group is used to group like products together without regard to the Manufacturer. The product group can assist in determining the pricing in the system for each item. In the pricing profiles (discussed later), each product group can be assigned a percentage up or down from a price level. The combination of the manufacturer, product line, and product group as assigned to each product AND the price level that is assigned to that product group within the price profile record AND the price profile that is assigned to the customer determines the price that the customer will be charged.
Manufacturer: The brand or manufacturer of the item. Used for reporting, customer pricing, etc. This usually represents the manufacturer of the product; however, it may be advantageous to assign as manufacturer the supplier of that product. Doing this will cause that item to be listed under that supplier in all purchase order and inventory reports. These values are maintained using the
Manufacturers task described later.
Product Line: Used to group like products together for a Manufacturer. Used for reporting, customer pricing, etc. Most inventory reports and sales analysis information is sub-totaled by this field. These categories will be used to get sales totals by product qualities within manufacturers or as product lines within vendors.
Examples:
- Manufacturer: Dupont
- Product Line: Centari mixing colors
- Product Line: Imron mixing colors
- Product Line: Lucite mixing colors
- Product Line: Staple products
- Manufacturer: Warehouse Distributor Vendor
- Product Line: 3M products
- Product Line: Norton products
- Product Line: Sharpe products
The manufacturer and product line work together within the system to organize products by sub-grouping. Manufacturer and product line may be changed at any time after initial set up. These values are maintained using the
Categories task described later.
VOC Class: Volatile Organic Compound classification. Where state laws require the reporting of V.O.C. usage by pre-defined classes, this field is used to identify the class to which this product belongs. These values are maintained using the
Data Maintenance task described later. DOT Code: Department of Transportation HAZMAT product classification. This controls the printing of the required hazardous material shipping information on invoices and separate bills of lading. The information printed includes the hazardous materials shipping code and weights information. These values are maintained using the Data Maintenance task described later. Tax Group: The tax group is used to specify the taxability of the item (i.e. never taxable, always taxable, taxable if in Florida, etc.). These values are maintained using the Taxes task described later. Is Auto Case Break: Select this box to allow on hand quantities from a larger unit of measure to be broken down to cover on hand requirements at a lower unit of measure.
Accounts Income/Expense Account: Select the appropriate general ledger account for this transaction (i.e. Income or Expense account). COGS Account: Select the appropriate general ledger account for this transaction (i.e. the Cost of Goods account). Consignment Account: Select the appropriate general ledger account for this transaction (i.e. the Consigned Inventory account). Asset Account: Select the appropriate general ledger account for this transaction (i.e. the Inventory Asset account). Note: The accounts are maintained using the G/L Accounts task. Units of Measure Add/Edit UOM: This field contains the valid Unit of Measures for this item (i.e. Each, Roll, Sleeve, Case, Pint, Gallon, etc.). Select the (Add) to add a new unit of measure or highlight an exiting unit of measure and the select the (Edit) button. This is also where the item prices, weights, vendor part, published cost, C/M Schedule Part, and which locations have this item and unit of measure available. Default Sales UOM: Select the default Sales Unit of Measure from the Unit of Measures entered in Add/Edit UOM. Default Purchase UOM: Select the default Sales Unit of Measure from the Unit of Measures entered in Add/Edit UOM.
Units of Measure Unit of Measures (UOM) must be created before an item can be priced for invoicing. There may be multiple units of measure for an item or only one. Also, the item can be flagged for Auto Case Break allowing on hand quantities from a larger unit of measure to be broken down to cover on hand requirements at a lower unit of measure. In this example, the item is flagged for Auto Case Break. The unit of measure of “Roll” is the Base UOM (the smallest UOM - which is first on the list of UOM’s) and Default Sales UOM. The unit of measure of “Case” is the Default Purchase UOM. Note: In order for Auto Case Break to work, the Default Purchase UOM must be a larger UOM than the one being sold on the invoice. The "Roll" unit of measure is shown below. The “Case” unit of measure is shown below and is set up to contain 48 “Rolls” (the conversion is .0208333). You can specify which unit of measures are valid by location or select the Available to all locations box.
To save the information keyed and actually create the new Master Inventory item, select the or the action buttons or the Save or Save and Close options located on the drop down menu Actions.
Group Items The Group Items Inventory type is used to sell one item and that then cause many items to be sold from inventory. This can be used to sell assortments, special promotions, pre-determined packages, etc. The on hand balances sold come from the Sub Items contained within the Group Item. The selling price is maintained in the Group Item while inventory is maintained in the sub items. A Published Cost can also be maintained in the Group Item but the Cost Average (used in calculating gross profit) comes from the sub items’ Local Inventory record. Item Type: Group Item
UOM: Select the desired unit of measure for this sub item for this group item. The default selling unit of measure is initially selected as the unit of measure. This is changed by selecting the unit of measure field (using the mouse or the Down Arrow) and then selecting the desired unit of measure.
Qty: Enter the quantity of the sub item to be sold when this group item is sold. General Information The fields in this area are is the same as described previously for the Item Type of Inventory. Accounts The general ledger account used for a Group Item is determined by the general ledger accounts specified in the individual sub items included in the Group Item. Sub Items This area is used to specify the items used to make up the Group Item. These sub items (with the specified unit of measures and quantities) are removed from inventory (depending on the Item Type of the sub item) each time the Group Item is sold. Delete Sub Item Row: Select the to delete a sub item row. Item Code: Enter the desired item to be sold when this Group Item is sold. The item code can selected using the following methods from the Item Code field (described in detail in the Order Entry – Billing chapter): Type the desired item code. Search for a character string by starting with the % wild card character followed by the character string (i.e. %633). Open the item code drop down box by double clicking or pressing Down Arrow. Then scroll through the items until the desire item can be selected.
In the Item Code drop down box, the item code is displayed with the item description appended to the end separated by a “-“. Item Description: If the item code was not selected in the previous Item Code field, enter the item description of the desire item to be sold when this Group Item is sold. The item description can be selected using the same methods as described in the previous Item Code field. In the Item Description drop down box, the item description is displayed with the item code appended to the end separated by a “-“. Edit Action To edit or inquire into a Master Inventory Item, you must first select the desired item from the list of items returned by the Search Action (see below). This is done by selecting the desired Master Inventory followed by one of the actions below: The action button. The Edit Item option from the drop down menu Actions. Double clicking the item line. Pressing the (Enter) key. The following screen displays the information for an existing Master Inventory Item. The fields on the Edit Item screen are the same as the Add New Item screen fields described previously.
Add New Action Select the action button (Add New Record from the drop down Actions menu) to save or discard changes keyed and change to or refresh the Add New Item screen. The following confirmation window is displayed if and data was keyed: Select the (Yes) button to save changes. Select the (No) button to discard changes. Select the (Cancel) button to return to the Edit Item screen and continue making changes.
Save Action Select the action button (Save from the drop down Actions menu) to save changes and remain in the current Master Inventory record.
Save & Close Action Select the action button (Save and Close from the drop down Actions menu) to save changes and return to the Search Master Inventory screen.
Close Action Select the action button (Cancel from the drop down Actions menu) to save or discard changes keyed and return to the Search Master Inventory screen. The following confirmation window is displayed if data was keyed: Select the (Yes) button to save changes. Select the (No) button to discard changes. Select the (Cancel) button to return to the Edit Item screen and continue making changes.
Search Action Search Master Inventory Screen Fields The search screen fields are used to build a filter so that the action (Filter from the drop down Actions menu) will display the desired Master Inventory Item. Enter the beginning portion or the entire value in any or all of the desired search fields listed below. Some fields have drop down boxes to assist in entering values by displaying valid entries. These fields are indicated with the down arrow button (i.e. the Item Type, Vendor, Product Group, etc fields).
Tax Group: Select the desire tax group from the drop down box. Note: The less information keyed to get the desired filter the better. Use the fewest search fields to get the filter you desire. Also, you can key only the beginning portion of a field to select all items beginning with the value entered. Item Type: Select the type of inventory. Item Code: Beginning at the start of the item code, enter as much as desired. Item Description: Beginning at the start of the item description, enter as much as desired. Vendor: Select the desired vendor from the drop down box. Product Group: Select the desired product group from the drop down box. Manufacturer: Select the desired manufacturer from the drop down box. Product Line: Select the desired product line from the drop down box. The Manufacturer must be selected first. In this example the search field used was the first letter of the Item Code for Item Type of “Inventory”. The button is then selected and the four Master Inventory Items that pass the filter are displayed in the record display area of the screen. You can also select the Filter option located on the drop down menu Actions.
Reset Action Select the action button (Reset Search from the drop down Actions menu) to clear the Search Screen and return it to the screen defaults so that a new search can be performed. This is the same as leaving the Search Screen and then again selecting the same Search Screen Task.
List All Action Select the action button (List All from the drop down Actions menu) to list all the records in the file. Note: This can take several minutes for large files. It is recommended that the Record Search button be used in conjunction with as many search fields as is practical.
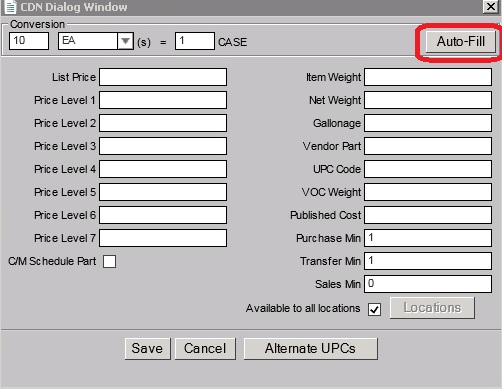
Auto-Fill of new UOMS
ComCept has added a feature to allow users to build additional UOMs on items much faster than before. This feature will take the base UOMs values and divide them along the new UOMs ratio. It will auto-fill all price, weight and UPC fields. Users will still be able to adjust all of the values after they select the Auto-Fill button. This is a completely optional feature.
How to Use the Auto-Fill Feature
Open an item that needs an additional UOM.
Select the
Add Button.
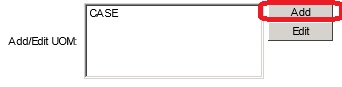
Type the appropriate ratio and select the new UOM. Next select the
Auto-Fill button.
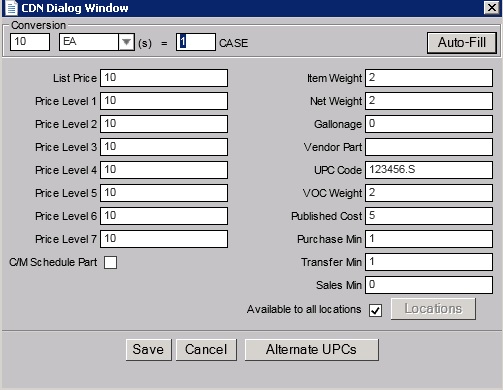
Notice all of the values will scale along the UOM ratio. The UPC will automatically add with a .S at the end of it. If .S is used already .S1 up to .S9 will display.