Page History: Local Inventory
Compare Page Revisions
Page Revision: 11/21/2011 11:35 AM
Local Inventory
This task is used to search, edit, or inquire into the local inventory on your system. The Local Inventory contains the information that is specific to the individual locations on the system (i.e. on-hand balance, stocking levels, bin locations, etc.).
Note: Local inventory records are automatically created by the
Master Inventory Add New action. New items must be created using this action before the Local Inventory task can be used.
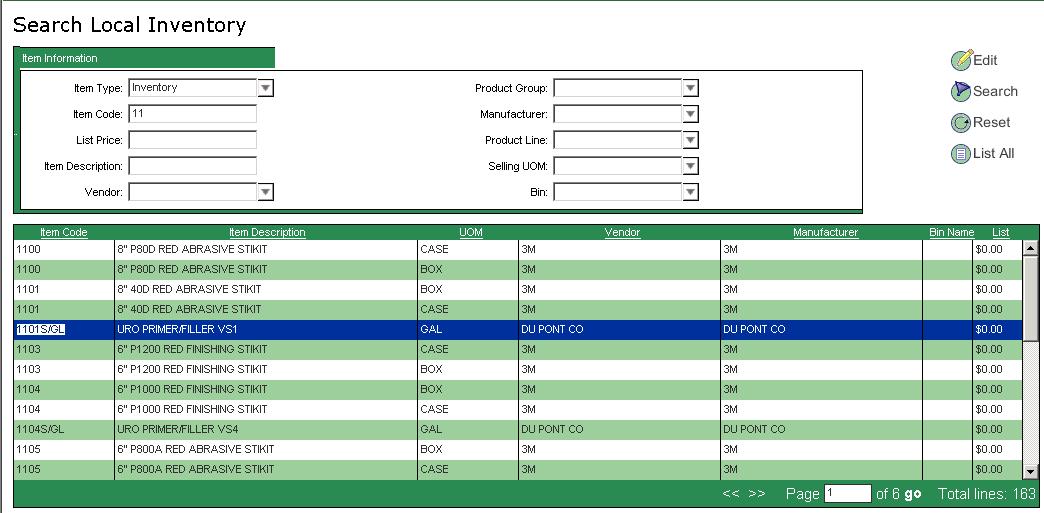
Search Local Inventory Screen
The
Search Local Inventory screen is the first screen that is displayed when the Local Inventory task is selected. This screen is used to search for
Local Inventory items that exist on the system. Individual items can then be selected for inquiry or editing from those displayed.
New Local Inventory items are automatically added by the
Master Inventory Add New action.

Edit Action
To edit or inquire into a Local Inventory Item, you must first select the desired item from the list of items returned by the
Search Action (see below) or from the
List All action.
This is done by selecting the desired Local Inventory followed by one of the actions below:
- The Edit action button.
- The Edit Item option from the drop down menu Actions.
- Double clicking the item line.
- Pressing the (Enter) key.
The following screen displays the information for the Local Inventory Item 6334 with two units of measure (Roll and Sleeve).
Item: 1101S/GL
Unit of Measure: Gallon
 Master Item Data
These fields are maintained in the
Master Inventory screen.
Item Type: Type of inventory used to determine how the item is processed.
Item Code: The inventory item number should be entered just as it is displayed on the package.
Item Description: The item description.
Item Short Desc: Future use.
Vendor: This is the supplier of the item and is used for purchasing, reporting, etc.
Manufacturer: The brand, manufacturer, or supplier of the item. Used for reporting, customer pricing, etc.
Tax Group: The tax group is used to specify the item taxability.
Sales: The general ledger account for this transaction (i.e. Income or Expense account).
COGS Account: The general ledger account for this transaction (i.e. the Cost of Goods account).
Consignment Account: The general ledger account for this transaction (i.e. the Consigned Inventory account).
Asset Account: The general ledger account for this transaction (i.e. the Inventory Asset account).
Product Group: The item product group used for pricing profiles, reporting, purchasing.
Product Line: The item product line used for pricing profiles, reporting, purchasing.
These fields are maintained in the
Master Inventory Units of Measure/Pricing CMS Dialog Window.
Selling UOM: The item selling unit of measure.
Core Charge: The additional value of the used item. This is charged as a deposit to the customer until the used item is returned for a refund.
VOC Class: Volatile Organic Compound classification. Where state laws require the reporting of V.O.C. usage by pre-defined classes, this field is used to identify the class to which this product belongs.
DOT Code: Department of Transportation HAZMAT product classification. This controls the printing of the required hazardous material shipping information on invoices and separate bills of lading. The information printed includes the hazardous materials shipping code and weights information.
Item Weight: Shipping weight of item (includes container)
Net Weight: Weight of product (excludes container weight).
Vendor Part: Future use.
PricingUse these price fields to override centralized pricing as setup in the
Master Inventory Units of Measure/Pricing CMS Dialog Window.
List Price: Manufacturer suggested list price.
Price Level 1: User defined.
Price Level 2: User defined.
Price Level 3: User defined.
Price Level 4: User defined
Price Level 5: User defined.
Price Level 6: User defined.
Price Level 7: User defined.
Qty’s and Costs
These are the location specific fields.
Min Stock: The minimum stock level. Future use.
Max Stock: The maximum stock level. Future use.
Safety Stock: The safety stock level. The purchasing programs will recommend purchasing to at least this level of inventory. It is ignored if the calculated purchasing level is higher.
Bin: Select the appropriate warehouse bin location from the drop down box. These are maintained in the
Bins task described earlier.
Purchase From: Select
Both, Vendor, or
Warehouse from the drop down box to control how this item is to be purchased for this location.
Blank indicates the item cannot be purchased.
Qty On Hand: The current on hand quantity.
Qty Committed: The total current committed quantity (i.e. quantities on customer orders, shipment documents, transfers, etc.).
Qty On Order: The total current on order quantity on purchase orders from suppliers.
Published Cost: The cost that will appear on the Line Items Details window.
Cost Average: The average cost. This is recalculated each time a purchase order or transfer is received.
Cost Last Landed: The cost use as the cost of goods on the invoice last invoice billed.
Cost Last Received: The cost on the last purchase order or transfer that was received.
Active For Sale: Select this box if the item can be invoiced at this location.
Active For Purchase: Select this box if the item can be purchased at this location.
Save Action
Select the
Save action button (
Save from the drop down
Actions menu) to save changes and remain in the current Local Inventory record.
Save & Close Action
Select the
Save and Close action button (
Save and Close from the drop down
Actions menu) to save changes and return to the
Search Local Inventory screen.
Close Action
Select the
Close action button (
Cancel from the drop down
Actions menu) to save or discard changes keyed and return to the
Search Local Inventory screen. The following confirmation window is displayed if data was keyed:

- Select the (Yes) button to save changes.
- Select the (No) button to discard changes.
- Select the (Cancel) button to return to the Edit Item screen and continue making changes.
Search Action
Search Local Inventory Screen Fields
The search screen fields are used to build a filter so that the
Search action (
Filter from the drop down
Actions menu) will display the desired Local Inventory Item. Enter the beginning portion or the entire value in any or all of the desired search fields listed below. Some fields have drop down boxes to assist in entering values by displaying valid entries. These fields are indicated with the down arrow button (i.e. the
Item Type, Vendor, Product Group, etc fields).
 Item Type
: Select the type of inventory.
Item Code: Beginning at the start of the item code, enter as much as desired.
List Price: Beginning at the start of the list price, enter as much as desired.
Item Description: Beginning at the start of the item description, enter as much as desired.
Vendor: Select the desired vendor from the drop down box.
Product Group: Select the desired product group from the drop down box.
Manufacturer: Select the desired manufacturer from the drop down box.
Product Line: Select the desired product line from the drop down box.
Selling UOM: Select the desired selling unit of measure from the drop down box.
Bin: Select the desired bin location from the drop down box.
Note: The less information keyed to get the desired filter the better. Use the fewest search fields to get the filter you desire. Also, you can key only the beginning portion of a field to select all items beginning with the value entered.
In this example the search field used was the first letter of the
Item Code for
Item Type of “Inventory”.

The
Search button is then selected and the 163 Local Inventory Items that pass the filter are displayed in the record display area of the screen.
You can also select the
Filter option located on the drop down menu
Actions.
Reset Action
Select the
Reset action button (
Reset Search from the drop down
Actions menu) to clear the Search Screen and return it to the screen defaults so that a new search can be performed. This is the same as leaving the Search Screen and then again selecting the same Search Screen Task.
List All Action
Select the
List All action button (
List All from the drop down
Actions menu) to list all the records in the file.
Note: This can take several minutes for large files. It is recommended that the Record
Search button be used in conjunction with as many search fields as is practical.

Inventory Adjustment Action
This action is used to adjust inventory for items used in the store’s operation such as mixing tints or to make a correction to the on hand of any inventory item.
Adjust Inventory Help Documentation